Preskoči na glavno vsebino

Kako ustvariti odvisne spustne sezname v dokumentu Word?


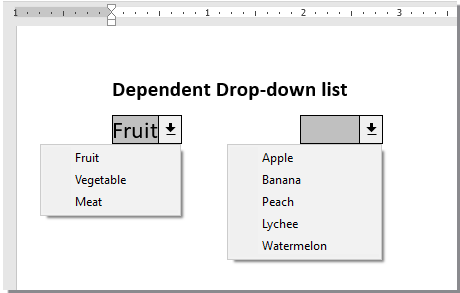
Kot je prikazano na levem posnetku zaslona, ​​morate omejiti izbire na drugem spustnem seznamu glede na možnost v prvem spustnem meniju, kako lahko storite? Ta članek vam bo pokazal način za ustvarjanje odvisnih spustnih seznamov v Wordovem dokumentu.

Ustvarite odvisne spustne sezname v Wordu s kodo VBA


Ustvarite odvisne spustne sezname v Wordu s kodo VBA

Spodnja koda VBA vam lahko pomaga ustvariti odvisen spustni seznam v Wordovem dokumentu. Prosimo, sledite navodilom korak za korakom.

1. Najprej morate v svoj Wordov dokument vstaviti dva spustna seznama. Kliknite Razvojni > Podedovane obrazce > Spustno polje obrazca. Oglejte si posnetek zaslona:

2. Z desno miškino tipko kliknite prvi spustni seznam (ta spustni seznam mora biti nadrejeni) in kliknite Lastnosti. Oglejte si posnetek zaslona:

3. Na odprtju Možnosti spustnega polja obrazca pogovorno okno, morate:

3.1 Vnesite kategorijo v Spustni element polje in nato kliknite Dodaj , ponavljajte postopek, dokler niso vse kategorije dodane v spustnem seznamu Elementi.

3.2 Vnesite ddfood v zaznamek škatla.

3.3 Kliknite na OK . Oglejte si posnetek zaslona:

4. Z desno miškino tipko kliknite drugi spustni seznam in kliknite Nepremičnine odprl svoj Možnosti spustnega polja obrazca in v pogovorno okno vnesite ddKategorija v zaznamek in kliknite OK . Oglejte si posnetek zaslona:

5. Pritisnite druga + F11 tipke za odpiranje Microsoft Visual Basic za aplikacije okno.

6. V Ljubljani Microsoft Visual Basic za aplikacije okno, kliknite Vstavi > Modul, nato kopirajte pod kodo VBA v okno modula.

Koda VBA: v Wordu ustvarite odvisen spustni seznam

Sub Populateddfood()
'Update by Extendoffice 2018/10/25
    Dim xDirection As FormField
    Dim xState As FormField
    On Error Resume Next
    Set xDirection = ActiveDocument.FormFields("ddfood")
    Set xState = ActiveDocument.FormFields("ddCategory")
    If ((xDirection Is Nothing) Or (xState Is Nothing)) Then Exit Sub
    With xState.DropDown.ListEntries
        .Clear
        Select Case xDirection.Result
            Case "Fruit"
                .Add "Apple"
                .Add "Banana"
                .Add "Peach"
                .Add "Lychee"
                .Add "Watermelon"
            Case "Vegetable"
                .Add "Cabbage"
                .Add "Onion"
            Case "Meat"
                .Add "Pork"
                .Add "Beef"
                .Add "Mutton"
        End Select
    End With
End Sub

Opombe:

1. V kodi spremenite elemente za vsak primer posebej, kot jih potrebujete.

2. ddfood in ddKategorija naj se ujema z možnostmi zaznamkov, ki ste jih vnesli v zgornjih dveh Možnosti spustnega polja obrazca pogovorna okna.

7. Shranite kodo in se vrnite v dokument.

8. Z desno miškino tipko kliknite prvi spustni seznam in kliknite Nepremičnine da odprete Možnosti spustnega polja obrazca pogovorno okno. V pogovornem oknu izberite zgornje ime makra (tukaj je Popolateddfood) iz menija Izhod in nato kliknite spustni seznam OK gumb.

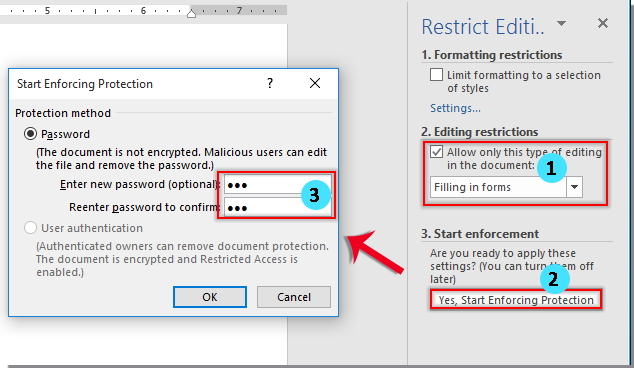
9. Zdaj kliknite Razvojni > Omeji urejanje kot je prikazano spodaj.

10. V Ljubljani Omeji urejanje podokno, morate:

10.1) Preverite Dovoli samo to vrsto urejanja v dokumentu škatla;

10.2) Izberite Izpolnjevanje obrazcev možnost s spustnega seznama;

10.3) Kliknite Da, začnite uveljavljati zaščito gumb;

10.4) V Začnite uveljavljati zaščito vnesite geslo in kliknite OK . Oglejte si posnetek zaslona:

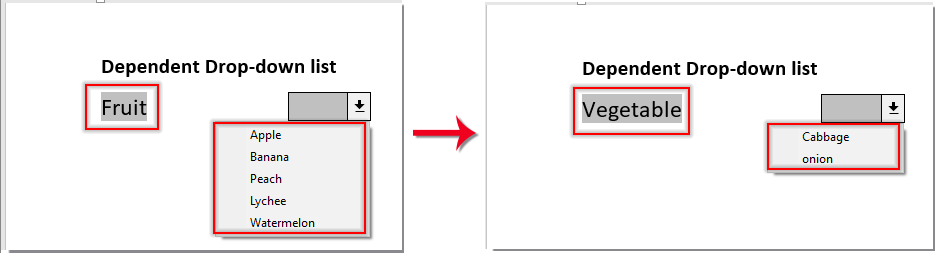
Zdaj je ustvarjen odvisen spustni seznam. Ko na prvem spustnem seznamu izberete Sadje, lahko na drugem izberete samo kategorije sadja.

Najboljša pisarniška orodja za produktivnost

Kutools za Word - Izboljšajte svojo besedno izkušnjo z Over 100 Izjemne lastnosti!

🤖 Kutools AI pomočnik: Preoblikujte svoje pisanje z AI - Ustvarite vsebino  /  Prepiši besedilo  /  Povzemite dokumente  /  Povprašajte za informacije na podlagi dokumenta, vse v Wordu

📘 Obvladovanje dokumentov: Razdeljene strani  /  Spoji dokumente  /  Izvozi izbor v različnih formatih (PDF/TXT/DOC/HTML ...)  /  Paketna pretvorba v PDF  /  Izvozi strani kot slike  /  Natisnite več datotek hkrati...

Urejanje vsebine: Serijsko iskanje in zamenjava čez več datotek  /  Spremeni velikost vseh slik  /  Prenos vrstic in stolpcev tabele  /  Pretvori tabelo v besedilo...

🧹 Čiščenje brez napora: Pometite stran Dodatni prostori  /  Prelomi oddelkov  /  Vse glave  /  Besedilna polja  /  Hiperpovezave  / Za več orodij za odstranjevanje pojdite na naš Odstrani skupino...

Ustvarjalni vložki: Vstavi Tisoč ločila  /  Potrditvena polja  /  Radijske tipke  /  QR koda  /  Črtna koda  /  Tabela z diagonalno črto  /  Naslov enačbe  /  Opis slike  /  Naslov tabele  /  Več slik  / Odkrijte več v Vstavi skupino...

???? Natančne izbire: Natančna točka določene strani  /  mize  /  Oblike  /  odstavki naslova  / Izboljšajte navigacijo z več Izberite funkcije...

Izboljšave zvezdic: Hitra navigacija do katere koli lokacije  /  samodejno vstavljanje ponavljajočega se besedila  /  brez težav preklapljate med okni dokumentov  /  11 Orodja za pretvorbo...

???? Želite preizkusiti te funkcije? Kutools for Word ponuja a 60-dan brezplačni preskus, brez omejitev! 🚀
 
Comments (32)
No ratings yet. Be the first to rate!
This comment was minimized by the moderator on the site
Hi there,

I have managed to follow the steps, thanks for your help.

I can't find my code when pressing Alt+F11 though? My drop downs are still there but I can't find the back coding?
This comment was minimized by the moderator on the site
Hi Crystal, thanks for the tutorial, it was useful and well written. Is it possible to add a third dropdown list with options that change depending on what is selected from the second dropdown list?
This comment was minimized by the moderator on the site
Hi Jack,

You can add a third drop-down list with options that change depending on what is selected from the second drop-down list. But you need to insert another "Drop-Down Form Field" and a new VBA code in advance.
1. Follow the steps from 1 to 4 in the post to create the first and second drop-down list and modify the properties.
2. Insert the third Drop-Down Form Field, double click to open it's Properties dialog box, enter a name in the Bookmark textbox (the same as the operation for the first and second drop-down lists) , in this case, I made up a random name called ddTaste, and then click OK.
https://www.extendoffice.com/images/stories/comments/comment-picture-zxm/word-drop-down1.png
3. Open the Microsoft Visual Basic for Applications window, enter the VBA code provided in the article into the Module1. Then insert a new Module (called Module2), copy and paste the following VBA code into this Module2.
VBA code: Use for the third dependent drop-down list

Sub PopulateddTaste()
Select Case ActiveDocument.FormFields("ddCategory").Result
Case "Apple"
With ActiveDocument.FormFields("ddTaste").DropDown.ListEntries
.Clear
.Add "AA"
.Add "BB"
End With
Case "Banana"
With ActiveDocument.FormFields("ddTaste").DropDown.ListEntries
.Clear
.Add "CC"
.Add "DD"
End With
Case "Peach"
With ActiveDocument.FormFields("ddTaste").DropDown.ListEntries
.Clear
.Add "EE"
.Add "FF"
End With
Case "Lychee"
With ActiveDocument.FormFields("ddTaste").DropDown.ListEntries
.Clear
.Add "GG"
.Add "HH"
End With
Case "Watermelon"
With ActiveDocument.FormFields("ddTaste").DropDown.ListEntries
.Clear
.Add "II"
.Add "JJ"
End With
Case "Cabbage"
With ActiveDocument.FormFields("ddTaste").DropDown.ListEntries
.Clear
.Add "LL"
.Add "MM"
End With
Case "Onion"
With ActiveDocument.FormFields("ddTaste").DropDown.ListEntries
.Clear
.Add "OO"
.Add "PP"
End With
Case "Pork"
With ActiveDocument.FormFields("ddTaste").DropDown.ListEntries
.Clear
.Add "QQ"
.Add "RR"
End With
Case "Beef"
With ActiveDocument.FormFields("ddTaste").DropDown.ListEntries
.Clear
.Add "SS"
.Add "TT"
End With
Case "Mutton"
With ActiveDocument.FormFields("ddTaste").DropDown.ListEntries
.Clear
.Add "UU"
.Add "VV"
End With
End Select
End Sub

Note: In the code, AA, BB, CC... are the items you want to show in the third drop-down list, based on what was selected from the second drop-down list. For example, when you select "Apple" in the second drop-down, the third drop-down list will display the items AA and BB. Please modify this items to meet your needs.
4. Save the code and go back to the document. Follow the step 8 in the article to specify the macro for the first drop-down.
5. Double click the second drop-down list, choose "PopulateddTaste" in the Exist drop-down list.
https://www.extendoffice.com/images/stories/comments/comment-picture-zxm/word-drop-down2.png
6. Then follow the step 8 to restrict editing in this document.
Now you have create a three level drop-down list.
https://www.extendoffice.com/images/stories/comments/comment-picture-zxm/word-drop-down3.gif
This comment was minimized by the moderator on the site
Thanks for getting back to me, your time and help is appreciated.
This comment was minimized by the moderator on the site
Hallo,

ist das ganze auch unter Outlook möglich. Leider bekomme ich das so nicht hin da die Eigenschaften des Dropdown Menüs ganz anders aussehen.

Ich wollte unter Aufgaben einen Reparaturauftrag erstellen wo man Gebäude,Bereich und dan Zimmernummer oder Bezeichnung auwählen kann.

Ist das möglich in Outlook/Aufgaben?


Danke
This comment was minimized by the moderator on the site
Hi,
You can create a drop-down list with custom field in Outlook Task window by following the steps in this article:
How To Add A Drop Down List With Custom Filed In Outlook Task Window?
https://www.extendoffice.com/documents/outlook/4453-outlook-custom-fields-tasks-drop-down.html
Or create a drop-down list in word then copy and paste it into the Task window as you need.
But if you want to create dependent drop-down lists in Outlook Task, no method has been found yet.
Sorry about that.
This comment was minimized by the moderator on the site
Hi, many thx for the detailed tutorial, but I have a question since the word template is for others' use. You mentioned protecting mode and a password is a must, this can do if I tell them the password, then there is a conflict: there are some other blanks which are needed to be filled in, this cannot be done only if the protecting mode is off. What should I do? Is there any method to meet both 2 needs?
This comment was minimized by the moderator on the site
Hi, thx for the detailed tutorial, but I have a question since the word template is for others' use, 
This comment was minimized by the moderator on the site
This was extremely helpful, thank you.
I have a question, is there a way to modify the code so that when I select a new item from the first drop-down list, the dependent one will clear up?
This comment was minimized by the moderator on the site
Sorry for the late reply, only stumbled upon this page today :-)
It already does that. The first statement inside the Select case ... End select construction clears the second list. If none of the criteria are met, nothing is added.
This comment was minimized by the moderator on the site
Hello, for some reason I cannot modify anything else in the word file if the drop down list is active. Is there a way to avoid that?

Thank you
This comment was minimized by the moderator on the site
I have the same issue has anyone been able to help on this one
This comment was minimized by the moderator on the site
سلام من همه مراحل رو رفتم ولی درآخر وقتی از لیست اول یه استان رو انتخاب می کنم تویه لیست دوم فقط شهر های اون استان رو نمیاره
چیکار باید بکنم؟
This comment was minimized by the moderator on the site
I am using this same code however the text that I replacing the ddcategory with has 100 plus words. Is there anyway to wrap the text to prevent it from going off of the page and disappearing?
This comment was minimized by the moderator on the site
I have the same problem!! :0
This comment was minimized by the moderator on the site
Thank you for this very useful resource.

Is it possible to repeat the same dependent drop down multiple times within a form?

I need the form filler to assign a category to each new row (but with the same options each time).I have successfully created the drop downs but when I restrict editing to test they seem to reset themselves as I work down the rows.

Thanks
Amy
There are no comments posted here yet
Load More
Please leave your comments in English
Posting as Guest
×
Rate this post:
0   Characters
Suggested Locations