Kako ustvariti mesečni / letni koledar v Excelu?
Čez nekaj časa morate v Excelu ustvariti določen mesečni ali letni koledar, kako ga lahko hitro rešite? Ta vadnica predstavlja trike za hitro ustvarjanje mesečnega ali letnega koledarja v Excelu.
Ustvarite mesečni ali letni koledar po Excelovi predlogi
Ustvari mesečni koledar s strani VBA
Preprosto ustvarite mesečni ali letni koledar z večnim koledarjem ![]()
 Ustvarite mesečni ali letni koledar po Excelovi predlogi

V Excelu lahko s predlogo koledarja ustvarite mesečni ali letni koledar.
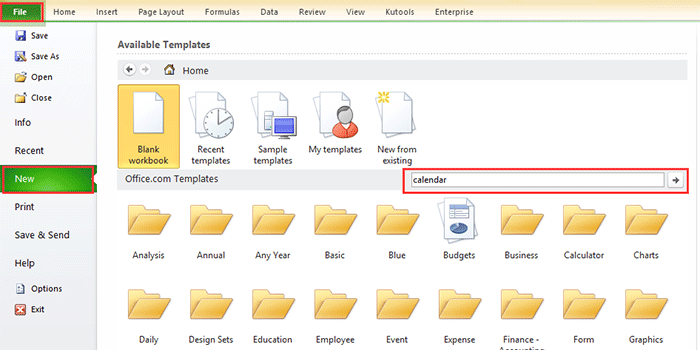
1. V Excelu 2010/2013 kliknite file > Novo, v Excelu 2007 kliknite Gumb za pisarno > Novo, nato v desni del pojavnega okna vnesite koledar v iskalnik. Oglejte si posnetek zaslona:
V Excelu 2010/2013
V Excelu 2007

2. Pritisnite Vnesite, nato se v oknu navede več vrst koledarjev. Izberite eno vrsto koledarja, ki ga potrebujete, in kliknite Prenos (ali Ustvari) v desnem podoknu. Oglejte si posnetek zaslona:

Zdaj je koledar ustvarjen v novem delovnem zvezku. Oglejte si posnetek zaslona:

Ustvari mesečni koledar s strani VBA
Včasih morate ustvariti enomesečni koledar za določen mesec, na primer januar 2015. Morda je težko najti takšno predlogo koledarja z zgornjo metodo. Tukaj predstavljam kodo VBA, ki vam pomaga ustvariti določen mesečni koledar.
1. Pritisnite Alt + F11 tipke za odpiranje Microsoft Visual Basic za aplikacije okno, kliknite Vstavi > Moduli, nato v okno kopirajte in prilepite spodnjo kodo VBA.
VBA: Ustvari mesečni koledar.
Sub CalendarMaker()

       ' Unprotect sheet if had previous calendar to prevent error.
       ActiveSheet.Protect DrawingObjects:=False, Contents:=False, _
          Scenarios:=False
       ' Prevent screen flashing while drawing calendar.
       Application.ScreenUpdating = False
       ' Set up error trapping.
       On Error GoTo MyErrorTrap
       ' Clear area a1:g14 including any previous calendar.
       Range("a1:g14").Clear
       ' Use InputBox to get desired month and year and set variable
       ' MyInput.
       MyInput = InputBox("Type in Month and year for Calendar ")
       ' Allow user to end macro with Cancel in InputBox.
       If MyInput = "" Then Exit Sub
       ' Get the date value of the beginning of inputted month.
       StartDay = DateValue(MyInput)
       ' Check if valid date but not the first of the month
       ' -- if so, reset StartDay to first day of month.
       If Day(StartDay) <> 1 Then
           StartDay = DateValue(Month(StartDay) & "/1/" & _
               Year(StartDay))
       End If
       ' Prepare cell for Month and Year as fully spelled out.
       Range("a1").NumberFormat = "mmmm yyyy"
       ' Center the Month and Year label across a1:g1 with appropriate
       ' size, height and bolding.
       With Range("a1:g1")
           .HorizontalAlignment = xlCenterAcrossSelection
           .VerticalAlignment = xlCenter
           .Font.Size = 18
           .Font.Bold = True
           .RowHeight = 35
       End With
       ' Prepare a2:g2 for day of week labels with centering, size,
       ' height and bolding.
       With Range("a2:g2")
           .ColumnWidth = 11
           .VerticalAlignment = xlCenter
           .HorizontalAlignment = xlCenter
           .VerticalAlignment = xlCenter
           .Orientation = xlHorizontal
           .Font.Size = 12
           .Font.Bold = True
           .RowHeight = 20
       End With
       ' Put days of week in a2:g2.
       Range("a2") = "Sunday"
       Range("b2") = "Monday"
       Range("c2") = "Tuesday"
       Range("d2") = "Wednesday"
       Range("e2") = "Thursday"
       Range("f2") = "Friday"
       Range("g2") = "Saturday"
       ' Prepare a3:g7 for dates with left/top alignment, size, height
       ' and bolding.
       With Range("a3:g8")
           .HorizontalAlignment = xlRight
           .VerticalAlignment = xlTop
           .Font.Size = 18
           .Font.Bold = True
           .RowHeight = 21
       End With
       ' Put inputted month and year fully spelling out into "a1".
       Range("a1").Value = Application.Text(MyInput, "mmmm yyyy")
       ' Set variable and get which day of the week the month starts.
       DayofWeek = WeekDay(StartDay)
       ' Set variables to identify the year and month as separate
       ' variables.
       CurYear = Year(StartDay)
       CurMonth = Month(StartDay)
       ' Set variable and calculate the first day of the next month.
       FinalDay = DateSerial(CurYear, CurMonth + 1, 1)
       ' Place a "1" in cell position of the first day of the chosen
       ' month based on DayofWeek.
       Select Case DayofWeek
           Case 1
               Range("a3").Value = 1
           Case 2
               Range("b3").Value = 1
           Case 3
               Range("c3").Value = 1
           Case 4
               Range("d3").Value = 1
           Case 5
               Range("e3").Value = 1
           Case 6
               Range("f3").Value = 1
           Case 7
               Range("g3").Value = 1
       End Select
       ' Loop through range a3:g8 incrementing each cell after the "1"
       ' cell.
       For Each cell In Range("a3:g8")
           RowCell = cell.Row
           ColCell = cell.Column
           ' Do if "1" is in first column.
           If cell.Column = 1 And cell.Row = 3 Then
           ' Do if current cell is not in 1st column.
           ElseIf cell.Column <> 1 Then
               If cell.Offset(0, -1).Value >= 1 Then
                   cell.Value = cell.Offset(0, -1).Value + 1
                   ' Stop when the last day of the month has been
                   ' entered.
                   If cell.Value > (FinalDay - StartDay) Then
                       cell.Value = ""
                       ' Exit loop when calendar has correct number of
                       ' days shown.
                       Exit For
                   End If
               End If
           ' Do only if current cell is not in Row 3 and is in Column 1.
           ElseIf cell.Row > 3 And cell.Column = 1 Then
               cell.Value = cell.Offset(-1, 6).Value + 1
               ' Stop when the last day of the month has been entered.
               If cell.Value > (FinalDay - StartDay) Then
                   cell.Value = ""
                   ' Exit loop when calendar has correct number of days
                   ' shown.
                   Exit For
               End If
           End If
       Next

       ' Create Entry cells, format them centered, wrap text, and border
       ' around days.
       For x = 0 To 5
           Range("A4").Offset(x * 2, 0).EntireRow.Insert
           With Range("A4:G4").Offset(x * 2, 0)
               .RowHeight = 65
               .HorizontalAlignment = xlCenter
               .VerticalAlignment = xlTop
               .WrapText = True
               .Font.Size = 10
               .Font.Bold = False
               ' Unlock these cells to be able to enter text later after
               ' sheet is protected.
               .Locked = False
           End With
           ' Put border around the block of dates.
           With Range("A3").Offset(x * 2, 0).Resize(2, _
           7).Borders(xlLeft)
               .Weight = xlThick
               .ColorIndex = xlAutomatic
           End With

           With Range("A3").Offset(x * 2, 0).Resize(2, _
           7).Borders(xlRight)
               .Weight = xlThick
               .ColorIndex = xlAutomatic
           End With
           Range("A3").Offset(x * 2, 0).Resize(2, 7).BorderAround _
              Weight:=xlThick, ColorIndex:=xlAutomatic
       Next
       If Range("A13").Value = "" Then Range("A13").Offset(0, 0) _
          .Resize(2, 8).EntireRow.Delete
       ' Turn off gridlines.
       ActiveWindow.DisplayGridlines = False
       ' Protect sheet to prevent overwriting the dates.
       ActiveSheet.Protect DrawingObjects:=True, Contents:=True, _
          Scenarios:=True

       ' Resize window to show all of calendar (may have to be adjusted
       ' for video configuration).
       ActiveWindow.WindowState = xlMaximized
       ActiveWindow.ScrollRow = 1

       ' Allow screen to redraw with calendar showing.
       Application.ScreenUpdating = True
       ' Prevent going to error trap unless error found by exiting Sub
       ' here.
       Exit Sub
   ' Error causes msgbox to indicate the problem, provides new input box,
   ' and resumes at the line that caused the error.
   MyErrorTrap:
       MsgBox "You may not have entered your Month and Year correctly." _
           & Chr(13) & "Spell the Month correctly" _
           & " (or use 3 letter abbreviation)" _
           & Chr(13) & "and 4 digits for the Year"
       MyInput = InputBox("Type in Month and year for Calendar")
       If MyInput = "" Then Exit Sub
       Resume
   End Sub
VBA prihaja s tega spleta https://support.microsoft.com/en-us/kb/150774
2. Pritisnite F5 ključ ali Run in odpre se pogovorno okno, ki vas opomni, da vnesete določen mesec, ko potrebujete koledar, glejte posnetek zaslona

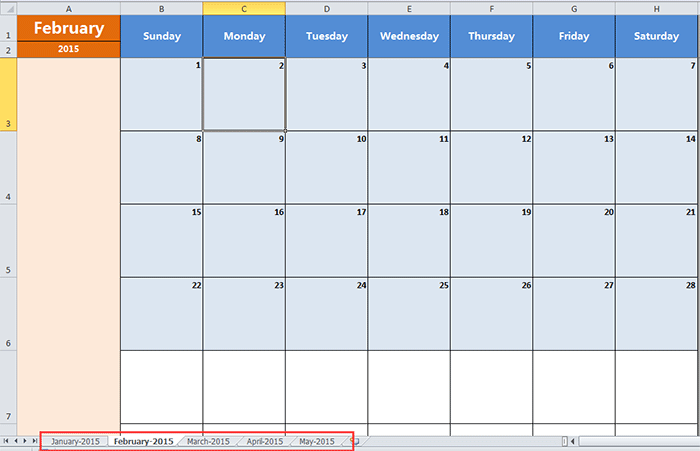
3. klik OK. Zdaj je v aktivnem listu ustvarjen koledar za januar 2015.

Toda pri zgornjih metodah obstajajo nekatere omejitve, če želite na primer koledar ustvariti od januarja do maja naenkrat, morate koledar ustvariti petkrat z zgoraj navedenima dvema načinoma. Zdaj predstavljam priročen pripomoček za hitro in enostavno reševanje
Preprosto ustvarite mesečni ali letni koledar z večnim koledarjem
Večni koledar je eno najmočnejših pripomočkov v Kutools za Excel, in vam lahko pomaga hitro ustvariti mesečni ali letni koledar v Excelu hkrati.
| Kutools za Excel, z več kot 300 priročne funkcije, vam olajša delo. | ||
1. klik Podjetje > Delovni list > Večni koledar. glej posnetek zaslona:

2. V pojavnem pogovornem oknu določite trajanje meseca, v katerem želite ustvariti koledar, in kliknite ustvarjanje. Oglejte si posnetek zaslona:

Nato se ustvari nov delovni zvezek s petimi koledarskimi listi. Oglejte si posnetek zaslona:
Nasvet:
Če želite samo ustvariti določen mesečni koledar, morate v pogovornem oknu Od in Do v polje z besedilom izbrati isti mesec.
Kliknite tukaj, če želite izvedeti več o večnem koledarju
Najboljša pisarniška orodja za produktivnost
Napolnite svoje Excelove spretnosti s Kutools za Excel in izkusite učinkovitost kot še nikoli prej. Kutools za Excel ponuja več kot 300 naprednih funkcij za povečanje produktivnosti in prihranek časa. Kliknite tukaj, če želite pridobiti funkcijo, ki jo najbolj potrebujete...
")
Kartica Office prinaša vmesnik z zavihki v Office in poenostavi vaše delo
- Omogočite urejanje in branje z zavihki v Wordu, Excelu, PowerPointu, Publisher, Access, Visio in Project.
- Odprite in ustvarite več dokumentov v novih zavihkih istega okna in ne v novih oknih.
- Poveča vašo produktivnost za 50%in vsak dan zmanjša na stotine klikov miške za vas!
")